15 Sep 2016
Adding unit tests to an MVP project, for fake internet points
You know what’s worse than creating a demo project about MVP and testing without actual tests? Posting said project to /r/androiddev. The only way I found to redeem myself after that mistake was to, not only add some tests to the project, but also write a post about the process. Hopefully, it will help other people out there, and will teach me a lesson never to try to fish for easy fake internet points.
The app under test
The app was developed to demonstrate how to use mosby, an MVP library developed by Hannes Dorfmann. It emphasizes simplicity, so it includes as few libraries as possible (sorry for the over-achievers out there: no Rx for today). It displays a list of books (title, author name and a preview image) in a recyclerview, and then, upon selection of an item, shows a more detailed view. See for yourself:

On tablet landscape (yes, because #configurationchangematters), it will look like this:

Applying MVP
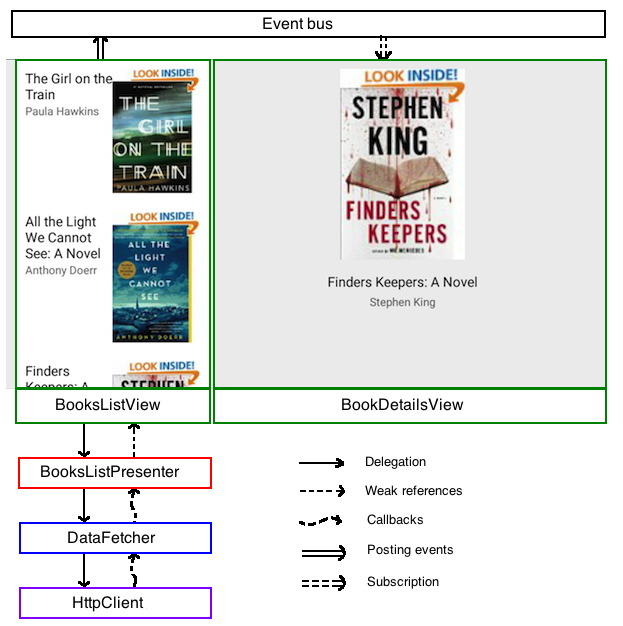
We apply MVP by introducing two views: BooksListView and BookDetailsView.
The first view, responsible of displaying the books, will delegate the task to BooksListPresenter. The presenter, after instructing the view to set itself in the loading state, delegates the job of fetching the data to the DataFetcher, and passes itself for callback. Once a response is received, and the callbacks propagate, the presenter decide whether to show the error or the data it received.
The second view, however, doesn’t need to do much. Since we already have all the data we need, there is no task to perform.
So, here are a few things to note from the diagram:
- My drawing skills are amazing.
- Once we delegate to the presenter, all the work is done in pure Java code1. This is arguably the only reason we go through all this hassle: to be able to run all this code on the JVM, including its unit tests. (If you are wondering why that’s a big deal, I suggest you look at this presentation, by yours truly. I’ll wait).
Unit testing the presenter
The basic idea behind unit tests can be summarized into Arrange-Act-Assert (or AAA). First, you arrange the conditions to execute what you want to do. Then, comes the time to act by performing the function we want to test. Finally, assert that the results match what we expect.
In the case of our app, the BooksListPresenter depends on two things:
- The DataFetcher: this is the component that the presenter uses to get the data.
- The BooksListView: this is the view that the presenter has to “act upon”. In our AAA cycle, this is the point where we want to assert.
Pulling out dependencies
It is important, at this point, to take a look at the code. I promise to show as little as needed, but, if you wanna have a more complete view (that compiles), I made a git tag just for you.
The code of the presenter:
public interface DataCallback<T> {
    void onSuccess(T data);
    void onFailure(String reason);
}

public class BooksListPresenter {
    private WeakReference<BooksListView> viewRef;

    public void attachView(BooksListView view) {
        viewRef = new WeakReference<BooksListView>(view);
    }

    public void detachView() {
        if (viewRef != null) {
            viewRef.clear();
            viewRef = null;
        }
    }

    public BooksListView getView() { return viewRef == null ? null : viewRef.get(); }

    public void loadBooks(final boolean pullToRefresh) {
        if (getView() != null) { getView().showLoading(pullToRefresh); }

        DataFetcher.getBooks(new DataCallback<Book[]>() {

            public void onSuccess(Book[] books) {
                if(getView() != null) {
                    getView().setData(books);
                    getView.showContent();
                }
            }

            public void onFailure(String reason) {
                Throwable t = new Throwable("Failed to load books: " + reason);
                if(getView() != null) {
                    getView().showError(t, pullToRefresh);
                }
            });
    }
}
When looking for dependencies, it is very important to understand how they affect our code.
The first dependency, on BooksListView, is pretty obvious to spot. Because we need to wrap the reference in a WeakReference, we have introduced two methods attachView()/detachView() that allow us to easily swap it in and out painlessly.
The second dependency on DataFetcher is a bit harder to untangle, because we are using a static method. While unit testing a static method is possible, it comes at a great expense on Android (due to its byte-manipulating nature). It is almost always cheaper to transform the code to make it more testable (and, consequently, better).
The solution, in this case, is to simply transform the static method into an instance call. We inject a DataFetcher instance at construction, and just call the same code.
public class BooksListPresenter<V> {

    private WeakReference<V> viewRef;
    private final DataFetcher dataFetcher;

    public BooksListPresenter(DataFetcher dataFetcher) {
        this.dataFetcher = dataFetcher;
    }

    //attachView(),detachView() & getView() don't change

    public void loadBooks(final boolean pullToRefresh) {

         //No changes

         dataFetcher.getBooks(new DataCallback<Book[]>() {
             //No changes here
         });
    }
}
Fake it until you make it
Because we want to run our tests on the smallest amount of untested code possible, we would like to surround the presenter with classes whose behavior is simple and predictable. This is where Test Doubles come in. Like stunt doubles in movies, they will replace the current implementation, but still expose the same interface. The easiest kind of test doubles are Fakes (and no, I didn’t just make up this name). According to Martin Fowler:
Fake objects actually have working implementations, but usually take some shortcut which makes them not suitable for production (an InMemoryTestDatabase is a good example).
This is perfect for the case of our network calls, because we already have an idea of what we want to return as shortcut. In this case, we convert our DataFetcher class into an interface, and simply define a FakeDataFetcher class that implements it (in the laziest way possible):
public interface DataFetcher {
    void getBooks(final DataCallback<Book[]> callback);
}

public class FakeDataFetcher implements DataFetcher {
    private String reason;
    private Book[] data;

    public FakeDataFetcher(String reason) {
        this.reason = reason;
    }

    public FakeDataFetcher(Book[] data) {
        this.data = data;
    }

    public void getBooks(DataCallback<Book[]> callback) {
        if (reason != null) {
            callback.onFailure(reason);
        } else {
            callback.onSuccess(data);
        }
    }
}
Now, when creating a DataFetcher, we can just tell it exactly what data to return, without having to make a single HTTP call, and it will oblige.
Testing the fake
Yep, I know, it sounds ludicrous, but you still gotta do: we need to ensure that the fake does behave according to specification. We want to build confidence in our code and the only way to do so is to write tests. First, we need to add two libraries to our project: JUnit and Mockito. In your app/build.gradle, add this to your dependencies (as of September 15th):
dependencies {
    //...

    testCompile 'junit:junit:4.12'
    testCompile 'org.mockito:mockito-core:1.10.19'
}
Then, go ahead, create a new folder called test under your main src folder. And create your FakeDataFetcherTest class (it is usually advised to put these under the same package as the class under test):
public class FakeDataFetcherTest {

    private static final Book[] data;
    private static final String reason = "Could not fetch books";       //Arrange

    static {
        Book b1 = new Book();
        b1.id = 1; b1.author = "Paula Hawkins"; b1.name = "The Girl on the Train";
        b1.imgUrl = "http://ecx.images-amazon.com/images/I/51-VcOHdoFL."
        + "_SL160_PIsitb-sticker-arrow-dp,TopRight,12,-18_SH30_OU15_SL150_.jpg";
        data = new Book[]{ b1 };                                        //Arrange
    }

    @Test
    public void dataFetcher_SuccessReturnsData() {
        DataFetcher dataFetcher = new FakeDataFetcher(data);            //Arrange

        dataFetcher.getBooks(new DataCallback<Book[]>() {               //Act

            public void onSuccess(Book[] data) {
                assertArrayEquals(data, FakeDataFetcherTest.data);      //Assert
            }

            public void onFailure(String reason) {
                assertTrue("Callback returned unexpected data", true); //Assert
            }
        });
    }

    @Test
    public void dataFetcher_FailureReturnsErrorMessage() {
        DataFetcher dataFetcher = new FakeDataFetcher(reason);          //Arrange

        dataFetcher.getBooks(new DataCallback<Book[]>() {               //Act
            @Override
            public void onSuccess(Book[] data) {
                assertTrue("Callback returned unexpected data", true); //Assert
            }

            @Override
            public void onFailure(String reason) {
                assertEquals(reason, FakeDataFetcherTest.reason);       //Assert
            }
        });
    }
}
So, we are testing both the success and the failure cases. When dealing with callbacks with multiple “returns”, it is necessary to guard against the callback we don’t expect. For example, when we are expecting a successful reponse in the first test, we need to ensure that the onFailure callback is never executed, and the best way to do that is to assert it.
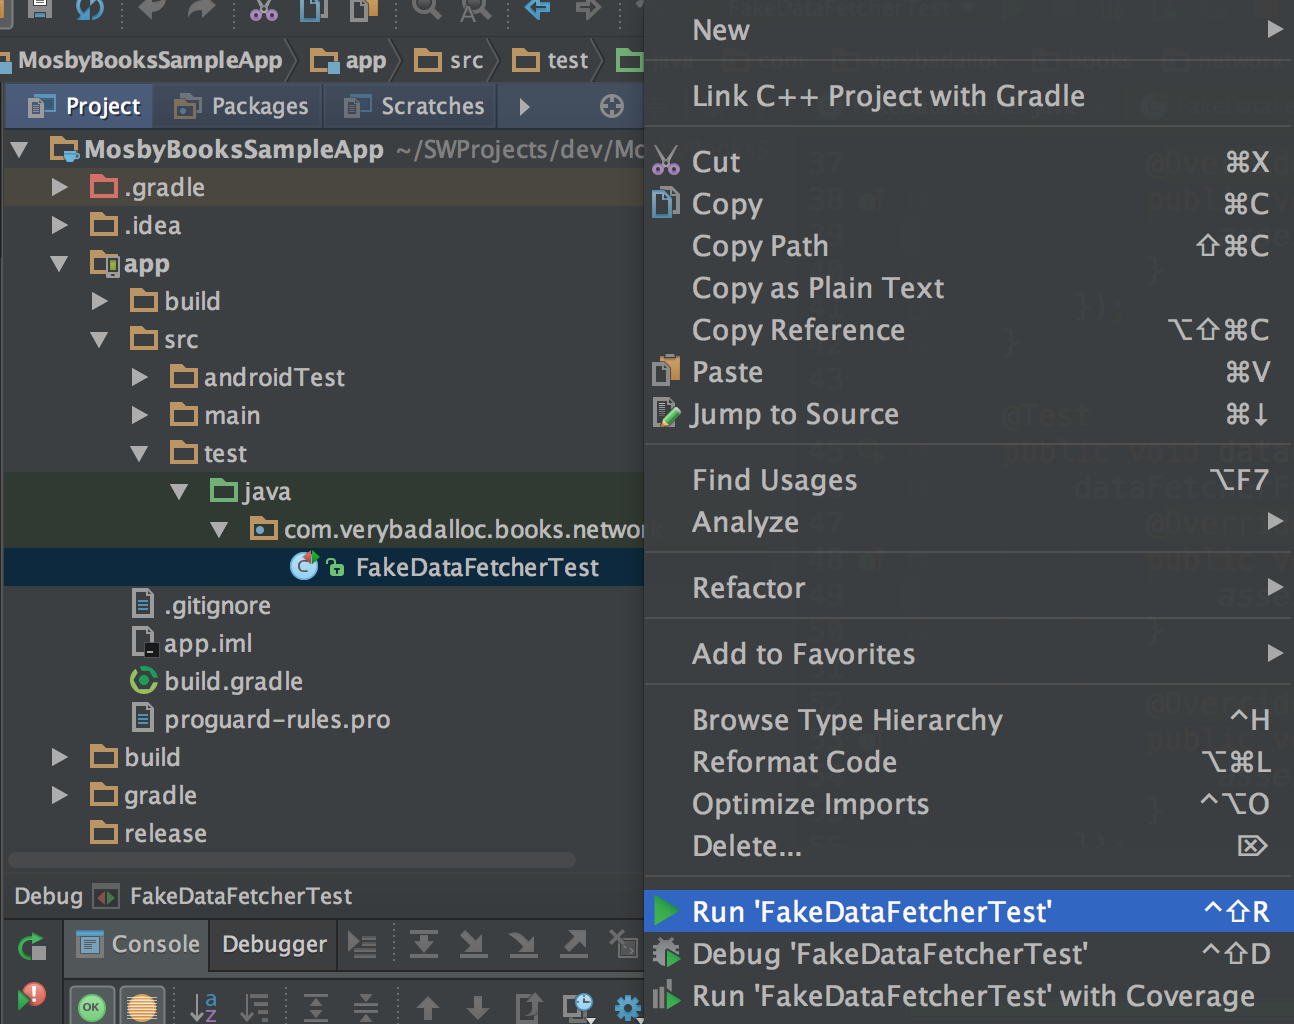
Given our file structure, we can right-click > “Run ‘FakeDataFetcherTest’, or select it among the run configurations.
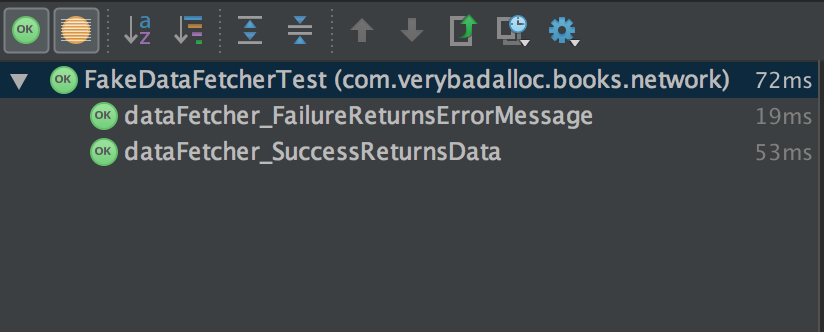
Surely enough, our tests pass, which means, we can finally move on to testing the presenter.
One last obstacle
Now that we know that our fake behaves correctly, we can test against it. Our second dependency BooksListView, however, is just an interface:
public interface BooksListView {
  public void showLoading(boolean pullToRefresh);
  public void showContent();
  public void showError(Throwable e, boolean pullToRefresh);
  public void setData(Book[] data);
We can’t use the same strategy here. First, we can’t instantiate interfaces. Plus, even if we wanted to implement it, there isn’t2 really a possible implementation that is fast, simple, and doesn’t depend on the Android framework. Finally, we only care about what methods the presenter called on our view, and not how the view behaves (at least for the scope of unit tests). What we really need is… a mock. Martin Fowler, again:
Mocks are pre-programmed with expectations which form a specification of the calls they are expected to receive. They can throw an exception if they receive a call they don’t expect and are checked during verification to ensure they got all the calls they were expecting.
And it turns out that Mockito does exactly that. Who would’ve guessed?
At last
Here is our BooksListPresenterTest class (it needs to go in the same app/src/test folder as the previous tests):
@RunWith(MockitoJUnitRunner.class)   //(1)
@SmallTest                           //(2)
public class BooksListPresenterTest {

    private static final String ERROR_DATA_FETCH = "Could not find data";
    private static final Book[] data;
    static {
        Book b1 = new Book();
        b1.id = 1; b1.author = "Paula Hawkins"; b1.name = "The Girl on the Train";
        b1.imgUrl = "http://ecx.images-amazon.com/images/I/51-VcOHdoFL."
        + "_SL160_PIsitb-sticker-arrow-dp,TopRight,12,-18_SH30_OU15_SL150_.jpg";
        data = new Book[]{ b1 };                                             //Arrange
    }

    @Mock BooksListView view; //(3)

    @Test
    public void failureDataFetcher_showError() {
        DataFetcher dataFetcher = new FakeDataFetcher(ERROR_DATA_FETCH);     //Arrange
        BooksListPresenter presenter = new BooksListPresenter(dataFetcher);
        presenter.attachView(view);
        boolean pullToRefresh = true;

        presenter.loadBooks(pullToRefresh);                                  //Act

        ArgumentCaptor<Throwable> throwable =       //(4)
            ArgumentCaptor.forClass(Throwable.class);
        ArgumentCaptor<Boolean> flag =
            ArgumentCaptor.forClass(Boolean.class);
        verify(view).showLoading(pullToRefresh);    //(5)                    //Assert
        verify(view).showError(throwable.capture(), flag.capture());
        assertEquals(ERROR_DATA_FETCH, throwable.getValue().getMessage());
        assertEquals(pullToRefresh, flag.getValue());
    }

    @Test
    public void successDataFetcher_showContent() {
        DataFetcher dataFetcher = new FakeDataFetcher(data);                //Arrange
        BooksListPresenter presenter = new BooksListPresenter(dataFetcher);
        presenter.attachView(view);
        boolean pullToRefresh = true;

        presenter.loadBooks(pullToRefresh);                                 //Act

        verify(view).showLoading(pullToRefresh);                            //Assert
        ArgumentCaptor<Book[]> books =
            ArgumentCaptor.forClass(Book[].class);
        verify(view).setData(books.capture());
        verify(view).showContent();
        assertArrayEquals(data, books.getValue());
    }
}
This is way too much code for a single shot, so you would have to bear with me here.
- The MockitoJUnitRunner: this is the part that runs your tests. We didn’t need to specify one in our FakeDataFetcherTest class because JUnit uses BlockJUnit4ClassRunner by default. However, because we want to use it along with Mockito it is necessary to make the switch explicit. Test runners sometimes feel like magic, so it is necessary to read on them:this article is a fantastic explanation of how JUnit test runners work.
- An annotation that states that these tests should run under 200ms, and don’t access any external resources. Other such annotations are @MediumTest (<1sec) and @LargeTest (>1sec).
- Where all the magic happens: Mockito creates an object that not only abide by the BooksListView interface, but is capable of keeping track of the execution of its methods. We can basically question it on which methods were called, how many times it happened, etc. Think of it as a replay functionality.
- ArgumentCaptor are used to capture argument values, thus allows us to further assert on the arguments.
- The syntax necessary to verify on our mock. We can then verify that the presenter did exactly what it is supposed to do, given the original conditions.
Here are the results:
Of course, in this case, we only tested for the two obvious test cases. In a real-world application, you would want to verify for edge cases (view == null), all combinations of input parameters (pullToRefresh = false), or guard against the framework (detachView() called before the callback propagates). It is easy to see how we could achieve the Holy Grail of software development, also known as 100% test coverage, at least on non-Android stuff. (I know, just thinking about it, I get chills down my spine).
Bonus paragraph (because this isn’t long enough, already)
For those of you who were paying attention, you will notice that I really didn’t have to fake the DataFetcher object, and that I could’ve used a mock here as well (Really, if you did notice, please leave a comment: I would love to meet you and thank you for being so diligent). And you would be absolutely right3. It’s just that I find it easier to fake objects when dealing with callbacks. See for yourself.
We rewrite the presenter tests to mock DataFetcher as well (and yes, I am only showing one test):
RunWith(MockitoJUnitRunner.class)
@SmallTest
public class BooksListPresenterTest {

    private static final String ERROR_DATA_FETCH = "Could not find data";
    private static final Book[] data;
    static {
        Book b1 = new Book();
        b1.id = 1; b1.author = "Paula Hawkins"; b1.name = "The Girl on the Train";
        b1.imgUrl = "http://ecx.images-amazon.com/images/I/51-VcOHdoFL."
        + "_SL160_PIsitb-sticker-arrow-dp,TopRight,12,-18_SH30_OU15_SL150_.jpg";
        data = new Book[]{ b1 };                                            //Arrange
    }

    @Mock
    BooksListView view;
    @Mock
    DataFetcher dataFetcher;

    @Test
    public void successDataFetcher_showContent() {
        BooksListPresenter presenter
            = new BooksListPresenter(dataFetcher);                         //Arrange
        presenter.attachView(view);
        boolean pullToRefresh = true;

        presenter.loadBooks(pullToRefresh);                                //Act

        ArgumentCaptor<DataCallback> callback =                            //Assert
            ArgumentCaptor.forClass(DataCallback.class);
        verify(view).showLoading(pullToRefresh);
        verify(dataFetcher, times(1)).getBooks(callback.capture());

        callback.getValue().onSuccess(data);                               //Act

        verify(view).showLoading(pullToRefresh);                           //Assert
        ArgumentCaptor<Book[]> booksArgument =
            ArgumentCaptor.forClass(Book[].class);
        verify(view).setData(booksArgument.capture());
        verify(view).showContent();
        assertArrayEquals(data, booksArgument.getValue());
    }
}
In this case, we end having to act twice: first, on the object under test, and second, on the callback object that we capture. This makes the test much longer, and opens up the black box of the method we are testing. But it is important to understand that it is also feasible.
Epilogue
I have compiled some interesting resources for further reading, but, you’ve already been through ~3000 words, so I am not gonna force them on you. Writing tests has truly become a much more streamlined process on Android now. Don’t miss out on the 100% test coverage spiritual experience.
- Step-by-step answer to why MVP on Android
- Source code used in this article
- Mosby, a library to implement MVP on Android
- ArrangeActAssert
- Mocking static methods in Java with PowerMock
- Against using PowerMock
- Test Doubles
- Mocks aren’t stubs
- JUnit in a nutshell: Test Runners
- Test sizes (Small, Medium & Large annotations)
- Unit testing asynchronous methods with Mockito
Notes
1This is not entirely true. One can argue that the HttpClient still has to rely on HttpUrlConnection, which is implemented somewhere in the OS.
2Actually, there is. We could go with a dummy, but why bother when there is a better solution.
3We can stub the implementation too. Have a look at this blog post on how to do so.
PS: I know I am not supposed to tell you what to do, but, you know, you could always follow me on Twitter